Showing posts with label Vegetables. Show all posts

Wednesday, April 27, 2011

Planting This Years Harvest

This post is an indirect path to food...actually it's a much more direct path to the actual food itself, but a round about way to the recipe from which I prepare my foods. Anyways, it's GARDEN TIME!

So you may or may not recall that I planted a few tomato plants in some containers last year (in about August).  And with some very careful babying I nurtured those plants along through the entire winter and I have been enjoying the fruits of my labor, literally, for the past several months.  However, in about February I noticed that the leaves on my sweet 100 plant were shriveling up and falling off.  I took a portion of the plant into the local nursery and they told me my tomato plant had caught a virus...my response "are you kidding! Is this something I can treat by putting some vitamin C in the soil?!?!!"  Their response, "Nope, just go home, enjoy what's left of the fruit and let your plant die a peaceful death."  I felt like I had just pulled the proverbial plug on my plants.

So while my final plant is dying away (I just harvested 5 ripe tomatoes off of it today and the last of the tomatoes should be off by next week - the leaves have long since given up the ghost), I decided it was time to replant my new seedlings.

A few weeks ago I planted a few seeds -- Jubilee tomatoes, Red cherry tomatoes, jalapeno, cilantro and basil.  The seedlings have been growing well (except that I killed all of the cilantro when I left the seed tray out in the sun for way too long (who knew an hour in the sun could do so much damage).  Obviously the cilantro seedlings were way too woosy for me.  So the surviving seedlings were in desperate need of replanting.  Last Saturday was the day.  Here's what happened.

Here are my desperate seedlings who need a new home.
Tomato starters


I got a bunch of buckets from a friend:
Buckets, and buckets, and buckets

I had to drill holes in all the buckets (and wouldn't you know that the whole time I did it all I could think about was that stoopid song "There's a whole in my bucket, dear Liza, dear Liza....":
Holes in my buckets

Then a little dirt, a little plant food, and voila -- a container garden filled with a tomato plants. I've got about 5 Red Cherry Tomato plants, 8 Jubilee Tomato plants, 3 jalapeno plants, 2 cilantro plants, and about 6 more basil plants waiting to eventually be replanted. In addition to the onions, full grown basil plants and the Oregano and Rosemary plants.
Container Gardening

A Red Cherry Tomato plant

Here are the jalapenos that were replanted in my handy-dandy radio flyer wagon:
Jalapeno plants

Now here's a quick tour of the other things that I have growing...

beautiful and positively delicious basil (and a bit of Greek Oregano)
Beautiful Basil

Basil -- the love of my life

cliantro for my fresh salsa
Cilantro

red onions (also for my fresh salsa)
Red onions

And last, but not least, my jalapeno plant
Jalapeno plant

Some day all of these scrumptious plants will bear fruit that I will harvest and turn into delightful eats. In the meantime I will spend my time watering, watering, and watering some more in this very dry desert climate.

Thursday, January 20, 2011

Butternut squash turns into a lasagna casserole

This post really is for my own benefit.  I love to experiment in the kitchen, create new recipes, etc. So one of my problems is that I don't write anything down so when I go back to recreate it I often can't remember what I did -- a symptom of age I assure you.
So tonight's experiment in the kitchen turned out F-A-B-U-L-O-U-S *said in a sing-songy voice*! I'm now going to capture the recipe here so I won't forget.  You're welcome to try it too and then send me your feedback.
**Side note - My dad and I are the true foodies in the family.  When I create new dishes he and I sit down and analyze them while we're eating. Comments surrounding this dish included - "Maybe try some italian sausage next time"..."The squash is cut up in just the right size"...."Good thing I didn't add the cabbage to the casserole. The cabbage flavor would have overwhelmed the squash" (we had steamed cabbage as a side dish).  We usually end up analyzing most meals we eat together.**

Back to the casserole. I've decided to call tonight's creation Butternut Lasagna Casserole.  I got 3 smallish butternut squashes in my Bountiful Basket this week and so I needed to use them up.  I first thought about doing a vegetable lasagna, which lead me to thinking about one of my favorite new sauces. One that actually comes in a jar:

Dave's Gourmet Butternut Squash Pasta Sauce. I've only seen it at Costco, but I really haven't looked too many other places. This stuff is delicious.  There are definite roasted red pepper undertones that add an element of heat, while the sauce is smooth and slightly sweet because of the butternut squash.  I just loooove this stuff.

So here's what I came up with tonight...


Butternut Lasagna Casserole
3 small butternut squashes
2-4 TBS olive oil
1 whole sweet onion
3 chicken breasts
1 box of pasta
1 - 15oz container of ricotta cheese
1 egg, beaten
1/3 c. grated Parmesan
1 tsp of herb de Provence
1/2 tsp dried basil
1 jar of Dave's Gourmet Butternut Squash Pasta Sauce
1/2 c. of grated mozzarella to top the casserole

These are pretty general directions:

1. I boiled the chicken in chicken broth and added 3 bay leaves to water.  Once the chicken was cooked I shredded it and set it aside.
2. I cut the skin off the butternut squash, scrapped out the seeds and then diced up the squash into 1/2 inch cubes.
3. I sauteed the butternut squash in a pan with 1-2 TBS of oil just until the edges of each cube started to turn transparent and some of the squares started to get a bit toasted.  I didn't want to cook the squash all the way, because I didn't want them to get to squishy in the casserole. I removed the squash from the pan and set it aside.
4.  I sliced up the onion into thin slices and sauteed the onions in another TBS or so of olive oil.
5. I boiled the pasta till just before al dente.
6. In a small bowl I combined the ricotta cheese with the beaten egg and Parmesan, and herbs.
7. In my 9x13 pan I combined the pasta, chicken, cooked squash and onions, and the pasta sauce.  Once everything was thoroughly combined I spread the cheese mixture over the top and tossed it lightly in with the rest of the ingredients. I wasn't going for a homogeneous mixture, rather I was looking for pockets of cheese amidst the other ingredients.
8.  I put the dish in a 350 degree oven for 30 minutes, after 25 minutes I pulled out the casserole, sprinkled the top with the grated mozzarella to melt over the top, and put it back in the oven for the final 5 minutes.

I call it a casserole, because I just mixed everything up.  I prefer to cook my ingredients separately before combing, because I find that this allows each element to develop its own flavor and characteristics which is preserved when combined with the other ingredients.  In the end, they all work harmoniously together to create a more complex and richer flavor.

For example, some would say just cook all your vegetables together, but if you did this then the sweet butternut squash would end of assuming the overpowering flavor of the onions and they would become lost by the time you bite in to the casserole after baking.  By cooking them separately you can enjoy the sweetness of the butternut, coated by the sweet and spicy pasta sauce followed by a burst of salty creaminess found in the ricotta mixture -- a harmony of flavor.

So on a scale of 1-5, 5 being the best...I'd give this recipe a 4.  Next time I might try improving the flavor profile of the chicken..hmmm...I've got to think about that some more.  Give this recipe a try and let me know what you think.

Any suggestions??

Saturday, November 27, 2010

Thanksgiving's Good Eats - everything's better with garlic

Thanksgiving is about family and food, and more food, and more food.  This year we gathered with my dad's family at my uncle's house.  There were roughly 50 of us.  Everyone is given a food assignment so no one person has to make all the food.  I was assigned 15 lbs of potatoes.  I was disinclined to bring just a bunch of plain, forgettable mashed potatoes.  And when I posted my assignment on Facebook I got all kinds of helpful suggestions, several of which (from my Hawaiian family members) included, "ditch the potatoes and bring rice."

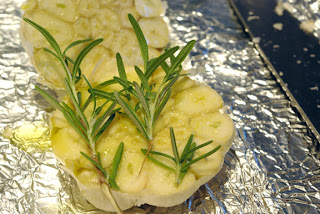
However, I decided to stick with tradition, but add my own little twist.  I roasted garlic and added it to PW's recipe for Creamy Mashed Potatoes (note:  I only used about half the cream cheese she recommended because it was getting a little too thin for my tastes.)  I added about 7 cloves of roasted garlic to 5 lbs of potatoes.  It turned our *FABULOUS*.  It was finger licking good...literally.  The crockpot with my garlic mashed potatoes was wiped clean.  Here's a shot of the garlic, just before I wrapped it up and roasted it. Sorry I didn't get one of the mashed potatoes, they went fast.  I would highly recommend this little trick.

Saturday, August 21, 2010

Roasted Green Chilis and Chili Rellenos Casserole

The fresh produce co-op that I've been a part of for the past 2 1/2 years had green chilies and tomatoes for sale in last week's offering. I love green chilies and can't stand paying $2 for a tiny 2 oz jar. So I ordered a 25lb bag of green chilies and 25lbs of tomatoes.

I guess I didn't realize how much 25lbs really is. It was a WHOLE LOT of chilies, as you can tell.

I did a little research on how to roast chilies and Focus New Mexico's page had the best set of directions. I'll let you read them for yourself. However, I am going to share photos of how my chilies looked along the way and a few of the "Note to self..." moments that I had.

"Note to self number 1 ... leave the chilies whole. Don't try to clean them out." I cleaned out all but the chilies in this photo. I definitely wouldn't do that again. I thought it would save me a step at the end, but I found it was easier to "gut" the chilies after they were soft from roasting, then it was to cut them open and carve out their guts while they were still fresh.

"Note to self number 2 ... the blacker the better." Roast the whole darn pepper. The parts that didn't turn black were harder to peel.

"Note to self number 3 ... don't overestimate how long it will take to blacken the chili." I found that the chilies roasted a whole lot faster than I was expecting (I did burn a whole batch *opps*)

So all the labor paid off in the form of a DELICIOUS Chili Rellenos Casserole. It was soooooo wonderful, with the fresh roasted chilies. I usually use canned chilies, so if you're not willing to slave over a hot grill (it was 110 degrees outside while I was roasting), then canned chilies will also work.

Chile Rellenos Casserole
by The Mesquite Tree

  • 15 oz can whole green chilies
  • chili rellenos
  • 1lb Monterrey Jack cheese

  • 12 eggs
  • 2 TBS flour

  • 4 TBS butter

  • 12-oz can evaporated milk


Preheat oven to 350 degrees and grease a 9"x11" pan. Remove seeds from green chilies. Slice cheese into 1/4" slices. Layer chilies, then cheese in casserole dish. Sprinkle flour and butter on top, then add another layer of chilies and cheese.

In a large mixing bowl, beat eggs and milk with wire whisk; pour over casserole.

Bake at 350 degrees for 1 hour. Serve with salsa.

*I'll save you the pain and agony and not post the nutritional information for a serving of this casserole...you're welcome!

Wednesday, April 8, 2009

A Bunch of Yummy

OK - I haven't posted in ages, but it's not because I haven't been cooking. It's actually because I've been too busy to even sit down and upload the photos. It's about all I can do to remember to take pictures of the food. So tonights post is the down-and-dirty on what's been going on in my kitchen. I'm only going to post a few recipes, but if you want one in particular that I haven't posted, you're welcome to email me and I'll send it to you. So here we go...

My new favoritest way to eat broccoli. In fact, I don't know that I'll ever eat it any other way again. It's Ina Gartner recipe (Barefoot Contessa) and IT ROCKS!!!!

ROASTED BROCCOLI
  • 4 to 5 pounds broccoli
  • 4 garlic cloves, peeled and thinly sliced
  • Good olive oil
  • 1 1/2 teaspoons kosher salt
  • 1/2 teaspoon freshly ground black pepper
  • 2 teaspoons grated lemon zest
  • 2 tablespoons freshly squeezed lemon juice
  • 3 tablespoons pine nuts, toasted
  • 1/3 cup freshly grated Parmesan cheese
  • 2 tablespoons julienned fresh basil leaves (about 12 leaves)
Cut up the broccoli, toss with olive oil and garlic slices, put on baking sheet. Bake in 425 degree oven (yes, I know that's hot) for about 15 min, just until barely fork tender. Take out of oven and immediately squeeze lemon juice on the broccoli. Toss with pine nuts and put in serving bowl/platter/plate. Add parmesan and basil just before serving. YUM YUM YUM (BTW, just did some broccoli like this last night and added it to orzo pasta with tomatoes, yellow peppers, artichoke hearts, olives, and fresh parmesan...again, fabulous.)


Tropical Cupcakes -- I had to whip up a birthday treat for one of my bosses last week. In scavenging through my cupboard all I could find was an old box of coconut cake mix. "Coconut?", you ask. "Yes," Coconut. Don't ask me where I got it or how old it was. I was desperate. Fortunately I found a way to "kick-it-up" a notch. I added chopped pineapple to the cake mix and then made coconut cream cheese frosting and then toasted coconut to add to the top. Tada! Tropical Cupcakes.

Oh, yum, kitty litter! On April Fool's day I took this delicious "Kitty Litter Cake" in to work. It was a HUGE hit. Several people stood around it and dared each other to take the first bite. After waiting till the sacrificial lamb declared it, they all dug in. You can find the recipe all over the internet. I would also recommend making it the night before you serve it and allow it to sit in your fridge over night. I think it helped the cake meld together.


Several years ago while at BYU I started a tradition of making crepes on General Conference morning. This year I invited a few of my friends over to join me. And let me tell you...They were the BEST DARN CREPES I've ever made. The toppings were amazing.

Crepes
8 eggs
2 1/2 c. flour
3 1/3c. milk
2 2/3 TBS sugar
1 1/3 tsp salt
1 TBS oil

Wisk all together and cook in pan. Hint: Crepes are supposed to be VERY thin. I usually pour little less than 1/4 in a pan and then swirl the pan around until the crepe batter essentially stops running because it's baking up. If you get it thin enough in the pan you only have to cook it on one side, because it will cook all the way through.

Lemon Cream -- this lemon cream was truly what set all of these crepes apart from the others.

1 c. cream cheese
1 c. confectioners sugar
1 TBS lemon zest
1/2 c. lemon juice
1/4 ts. lemon extract

cream it all together. We spread a little down the center of the crepe and added fresh strawberries, rolled them up and then topped them with homemade chocolate sauce. Aggghhh!! They were fabulous!


And finally a delicious soup/stew, or as I like to call it a "stoup". I got the recipe from Better Homes And Garden magazine and it was the perfect stoup for the crockpot. I deviated from the recipe a little because I was too cheap to by pork shoulder, and I used healthy turkey sausage instead of polish sausage, but it was still DELICIOUS and tasted just a great the 2nd and 3rd day. If you want the recipe let me know and I'll email it to you.

Slow Cooker Holiday Pork Stew - Better Homes and Garden